Sometimes when you turn the hyphenation tool off the first few lines of the text spread the words out more so this doesn't look visually correct. Hyphenation can be necessary.
If you use the hyphenation settings this can tackle to the above issue.
To place a hyphen where ever you'd like you can put in a discretionary hyphen found in the type settings and insert special character. To use this method you need to have the hyphenation turned on.
Like with paragraph styles you can add character styles through the type tab.
You set them up in the same way as paragraph styles but as not to cause confusion it may help by pressing shift first with character styles so the two don't get mixed up. You have to select a word or character for this to work and then also to apply it to other characters.
Within the paragraph style options you can format certain parts of the paragraph using the character style you've already set up via the drop caps and nested styles option. With this option you can specify when and where this character style applies to. You can type in any character instead of using the options listed so the programme knows where to apply to style you are setting.
Master pages
If you apply something on the master page it then appears on every single page on the same side you've applied it to.
When you try and select a 'master page' item on your original document it can't be selected or moved.
To unlock a master page item you press CMD and shift and click on the item if you need to make any changes.
To re-lock something you've unlocked you press CMD and L.
You can also drop and drag something from the master page to the document if it disappears for some reason.
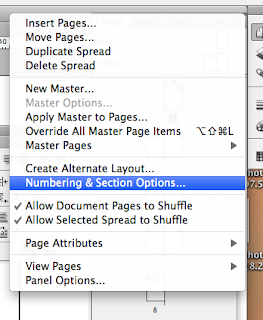
These are the options you select to create page numbers. You need to make a text box before selecting this option. It creates a letter rather than a number because it is based on the master page and created there. (As seen below)
To alter where the page number starts you use the options from the drop down menu where you pages are located.
You can choose where the numbering starts and there is also options if you are creating chapters. You are able to choose the style of number eg. Roman numerals.
To start a new section use the same option as above but select where you'd like the new section to start. You use these options if you want your first page to appear later as it traditionally would in a book or document.
Instead of 1 you would input the first page to start at 3.
Due to the fact there is now two number one pages it is better to change the first couple to Roman Numerals so there is no confusion when printing.
Booklet printing
To work out the pagination you start with the number one on the right hand size and zig zag down left to write with each number in order and then once you get half way you work your way back up to the top.
These are all the options to set up the document to print properly. The final option is just a preview so you can make sure the pagination has worked.
To create the booklet into a uncompressed PDF file there is also a printing option found where we would usually choose the printer we want to send the file to. You also need to select Adobe PDF 9 which means you can make this file up to A0 in size. When you choose this option you have to save it before it actually prints. When you view this file all the pages have been reorder for print spreads and then you can print this and put it together.
When saddle stichting there is a limit to the number of pages you can have per section so pages in the middle don't stick out, this is usually determined by the weight of the stock.
When printing you can choose the range of pages you are going to print but you need to decide how many pages you are having in each section. All of the pages will the be re-ordered into the first section.


No comments:
Post a Comment